Monday 16 June 2014

Bat lures


How to make a bat lure.


Acoustic lures are now sometimes being used for bat surveys whereby ultrasound is used to attract bats to mist nets or harp traps. This can be especially valuable in dense woodland which is difficult to survey, and where bats may be feeding high up in the canopy. The addition of acoustic lures to Natural England Class 19 and 20 licenses also means that more consultants are now able to use this technique.

The broadcast of ultrasound has always been problematic however. Most commercial loudspeakers only work up to the low 20 kHz range, and even then are relatively low-powered. The excellent Ultrasound Advice S55 loudspeaker and amplifier is no longer available which used to be the only commercially available speaker to be able to output at sufficiently high levels over the full ultrasound range used by bats.

There are now a number of commercially available acoustic lure systems, but here I will show how it is possible to make an acoustic lure for bats and generate the sound files necessary based on separate components which are currently available.
The two major limitations are the loudspeaker, and the signal generator.

The speaker

The Pettersson L400 ultrasound loudspeaker is a specialised tweeter housed within a rugged aluminium box and powered by either eight AA batteries or a 12-28 Volt external supply. It can handle a frequency range of between 10-110 kHz at up to 100 dB SPL at 1 m. It has a built-in volume control knob and a female phono connection to accept input signals. It’s available from NHBS at £1400 or direct from Pettersson.


There is also a standard camera tripod mounting bush on one side allowing it to be mounted on a tripod. The frequency response (below) shows it more than capable of outputting signals over the range used for acoustic lures.


The extended frequency response should also allow realistic reproduction of bat echolocation calls, but this would require very high sampling sound cards (which are only now becoming available) or digital to analogue output cards running via data acquisition software such as Labview. There are now some sound cards that operate at 192 kHz which could potentially allow playback of frequencies up to 85 kHz.
The broadcast system

This used to be a severe limitation in the broadcast of ultrasound signals in that you need a sampling rate at least twice that of the highest frequency signal you want to output. The typical industry standard maximum sampling rate was 44.1 kHz, meaning that you could only output signals up to 22 kHz. This would actually work fine for social calls of pipistrelles, but is a bit of a limitation for anything else. However, improvements in technology and demands from consumers for better quality audio has meant that higher sampling rates are now available in small affordable devices, and the new maximum sampling rate often quoted is 96 kHz. This means that it should be possible to output signals at up to 48 kHz, good enough for low frequency bats. The broadcast of full bat echolocation calls is still very specialist and usually requires complex (and expensive) data acquisition cards. However, 48 kHz is more than good enough for an acoustic lure.


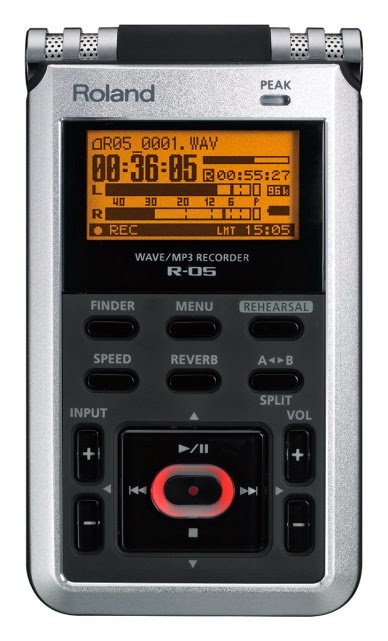
One such device is the Roland R-05 recorder (sometimes marketed under the Edirol brand – Edirol being just a brand used by Roland). While this device can sample at up to 96 kHz, so theoretically output up to 48 kHz, the specification shows it limited to 40 kHz, probably due to anti-aliasing filters somewhere along the line. The Zoom devices such as the Zoom H1, H2 and H4 also appear to have 96 kHz sampling rates, so should also be suitable, though I haven’t been able to find any specifications on the actual available bandwidth. If you don’t have one of these devices, you could also use the speaker (line) output from a laptop if it supports the higher sampling rates.
Connecting the two

All you will need to do now is to connect the recorder to the speaker, and for this you will need a 3.5mm stereo jack to phono lead. The jack goes into the recorder, and one of the phono leads attaches to the speaker. For the recorder, it is important to put the lead into the Line-out socket, not the headphones socket. If you recorder does not have a line-out socket, the headphone socket may be configurable as a line-out socket through the device’s menu or by a switch. Have a look at the manual.

As your recorder is a stereo device, it can create two separate tracks for each file, a left and a right. If you create the file on one channel (see below) then you will need to connect the right end of the lead to the phono socket on the loudspeaker. The easy way to remember this is that Red is Right. So if you create your file with the lure sound on the right channel, connect the red lead, if it’s on the left channel, connect the white lead. If it’s on both channels it doesn’t make any difference which lead you use. It’s also possible to create a mono file that doesn’t have two separate channels, so again, connect either lead. I don’t suggest you do this as some modern digital devices have trouble with mono files and don’t know what to do with them. It’s safer to create a stereo file as you know it will work.

Now that you have the hardware set up, all you need to do now is to create the lure sound files.
Creating the lure files

One of the easiest and most versatile pieces of software to generate lure files is Adobe Audition, however, this is a costly piece of software (about £250), so I’ll show how to do it in Audacity, an excellent freeware program available for Windows, Linux and Macs from:


So download and install Audacity, which is quite a small program so installs very quickly.

You should now be looking at something like that below:


The first thing we need to do is to change the project settings to reflect both the correct data type and the correct sampling rate.

Go to Edit>Preferences then select ‘Quality’ and change the settings for the Default Sample rate to 96000 Hz and the Default Sample Format to 16-bit.


The Roland recorder, and many others, are capable of recording and outputting files at 24 bit. However, for our purposes, this just means that the files are bigger and there is a greater risk of them not outputting correctly, so it’s safer to stick to 16 bit.

Then click ‘OK’.

You should now see that the project rate in the bottom left hand corner of the screen says 96000 Hz.


Now we’re ready to generate out lure files.

There is a great deal of debate about what acoustic lure files work best, and it’s still a matter of trial and error, so we’ll create one that has the elements of those which are suggested to work well. Once we can create one, then we can tweak all the components as much as we like.

First, create a new blank track.

Go to Tracks>Add New>Stereo Track

This should create a new blank audio track that we can put out generated signals into. By default, what we generate in one track should also happen in the other track too.


So now we’re looking at two tracks, click the mouse into one of the tracks at the far left hand side.

Then go to Generate>Chirp and in the box that appears, select the waveform as Sine, the start frequency as 35000, the end frequency as 25000, the start amplitude as 0, the end amplitude as 1, the interpolation as logarithmic and the Duration as 00.025 seconds, as shown below.

Then click OK


This will generate a tone that will start quiet at 35 kHz, then sweep down logarithmically to reach maximum intensity at 25 kHz 25 ms later. This is the first half of our tone. We now need to make it sweep back up again.


This time, select the right most side of the signal you have just generated, but now go to Generate>Chirp, but do the opposite, start at 25000 and intensity 1, and end at 35000 intensity 0, with the duration still set to 0.025 seconds.


If you now go to View>Fit In Window, you should see the signal looking something like this:


So now we have a signal that starts at 35 kHz, sweeps down to 25 kHz, then back up to 35 kHz in 50 ms.

The sonogram, (in Batsound) looks like this:


Notice that there is a little frequency  ‘blip’ at the bottom of the sweep, this is caused by the joining of the two signals that are not quite in phase. This is a little messy, which is why it’s easier to generate these files in Adobe Audition where we can generate these frequency modulations more easily, but we can live with this.

Now we have one sweep cycle, we can just copy and paste the generated file as often as we like to build up a sequence.

Click the mouse onto the left hand of the waveform and either drag it to the right hand side, or click over the left hand side of the waveform and hold down the Shift key and use the right hand arrow button to select the whole waveform. This is better as the selection stops when you reach the right hand side.

The select Edit>Copy and click or use the cursor keys to select the right hand end of the waveform and lick Edit>Paste or use Control+V and you’ve added a copy of the waveform, so now you have two up and down cycles. If you can’t see it all, go to View>Fit In Window.

Now go to the end of the next waveform and press Control+V again, and you get another one, go to the end of that one and press Control+V and so on. I’d suggest perhaps ten cycles, so the total lasts now 500 ms. In Batsound it now looks like this.


Now we could leave it at that, and it will work, but it’s nice to have a bit of a lead in and lead out time, so we’ll put some silences at the beginning and end, I suggest  500 ms will do.

Select the very start of your sequence, and then go to Generate>Silence. In the box put in 00.500s


Click OK, then go to View>Fit in Window.

Do the same at the end of the track to add a 500 ms silence at the end.

And that’s it!

The final file looks like this:


You can now save your file as a .wav file onto the memory card of your recorder go to File>Export  and choose WAV file format, paying attention to any specific file format rules that might apply to your recorder. The Roland R-05 should be able to play files with any name.


After exporting your .wav file, you can save your project file, it is saved as an .aup file which audacity can then edit again.

If you have a repeat play function on your recorder, then simply play the file but set it to repeat over and over. If you don’t have a repeat play option, then simply copy and then paste the whole of your sequence at the end of the preceding part to double it up, and then copy and paste again to double that up and so on until you have a sequence the length you need.

Once you have mastered the general principles you can create files of almost any structure by combining sweeps, tones, silences, noise and so on.

If you want to make more complex amplitude modulations (i.e. change the loudness up and down), then a good way is to use the Envelope Tool, which allows you to select different parts of the waveform and then drag their amplitude up and down as shown below.


Audacity is a very sophisticated program, and there are better ways of achieving the same end but this requires the use of scripting to combine two or more waveforms to achieve both the frequency modulation and the amplitude modulation.

If the clicks bother you at the bottom of the waveforms then you can use Audacity to high pass the signal above 20 kHz (go to Effect>High Pass Filter then set the slider to 20000 Hz).  It may be that the bats like the clicks. The signals that they seem attracted to bear no relation to their normal social calls, perhaps they’re just very inquisitive animals?
Using real social calls

One final note is that if you have recordings of real social calls, you might want to use those instead. However, you will need to convert the sample rate to that of the output device. In principle, this is can be easily done in Audacity, but there are a number of issues to consider.

 If you have files from a D500x, D1000x or other device that streams the sound files to a memory card, then the file header has the real sample rate embedded within it, such as 500 kHz. In this case if you simply open the file and go to the Tracks>Resample option and type in the new sample rate, Audacity will resample the track down to the new sample rate which should match that of the recorder i.e. 96 kHz to maintain both the duration and the frequencies of the original signal. However, you are in effect aliasing the signal by resampling at too low a sample rate to preserve all the information. This means that parts of the signal higher than 48 kHz will be aliased which may create some unwanted lower frequency elements. Anything below 48 kHz should remain unaffected. It does seem though that Audacity will automatically low-pass the signal before resampling, meaning that aliasing should not be a problem, though obviously anything above 40 kHz will be lost.
The situation is a little more complicated for time-expanded signals which have been recorded on an external recorder. Say a 2 second sequence has been recorded and output as 10x time expansion so that it lasts 20 seconds and recorded onto an external device at a sampling rate of 44.1 kHz. If we resampled this signal up to 96 kHz, we would still have a 20 second long track where all the frequencies were 10x lower than we needed, we would just have a signal with a higher sampling rate.

First we need to change the sample rate in the file header to make the sequence 2 seconds long again, and so with the drop down box from the ‘Audio Track’ option to the right of the track, select ‘Set Rate’ and choose a sample rate 10x that of the original file – if it was 44.1 kHz, select  Other’ and type in 441,000 Hz (note that Audacity works in Hz rather than kHz so always multiply any kHz frequencies by 1,000).


Now we have a file of the right length (2 seconds) and with the right frequencies, we have to choose the Tracks>Resample option and set it to 96 kHz, to allow out recorder to play it.
It should be pointed out that resampling can sometimes introduce some nasty artefacts into recordings, so always look (and listen) to the recordings afterwards to make sure they are faithful to the original.
 
I should add of course that ultrasound is very directional, and will be beamed quite tightly from the loudspeaker, higher frequencies being more directional. So a low frequency (15-20 kHz) signal will be broadcast quite widely, while a 40 kHz signal will be pretty directional. The Sussex Autobat has the famous 'twiddler' that broadcasts that signal around (and also adds some amplitude and frequency modulations that appear to make the signal more attractive), so using the L400 it would be best to change the direction of broadcast frequently during a session.

Wednesday 4 June 2014

Pettersson M500 Review


I've been lucky enough to try out the new Pettersson M500 detector over the past few months. This is a small hand-held device that allows you to both view and record full spectrum bat echolocation calls onto a windows laptop or tablet. The principle is that rather than record echolocation calls onto the device, or onto a separate recorder and analyse them later, you can record the calls directly onto your laptop/tablet via a USB cable. Not only that, but you can actually see what you are recording at the same time as well.

While this seems like a new idea, in fact Pettersson Electronik produced a special version of Batsound some years ago that allowed you to record onto a laptop via a PCMCIA data acquisition card. The limited computing power and battery life of laptops at the time, plus the cost of the data acquisition card made this something of a specialist item however, though the quality of recordings made via this method was outstanding. Now, with better faster electronics, and a price below £400, we have the M500.

What do you get?

The initial package is surprisingly small, giving some hint as to the size of the device, but it's only when you unwrap it from the plain box that the tiny size of the device is brought home.


It's a tiny little thing, very light but it feels solid and robust and seems to be mostly made from aluminium, so should take a fair bit of field use. There are with no buttons, just a small translucent spot behind which is a red LED to show you when it's operating, but more of that later.
 
The little cone on the front protects the microphone, which is the same electret microphone used in the D500x static logger. The cone also enhances the directionality of the microphone and its on-axis sensitivity, and can be removed if you want to make the detector more omnidirectional.
 
 
To remove the cone you simply gently twist and pull. Doing this does leave the microphone rather exposed, and while these microphones are reasonably robust, they can be damaged by water, so unless you have a real need to do this, I would suggest leaving the cone on.
 
 
At the other end is the USB connection. Mine came with a curly UBS lead that extended out to about 60cm, but as there is a highly standardised USB mini-B socket on the bottom, any decent quality cable should do. I would be cautious about leads over 2m as due to the high data throughput, there might be signal loss along the way. The device is powered via the USB socket as well, so no need for batteries.
 
 
And that basically is that, a small box with a microphone and a lead, and I assume some wild electronics inside.

Specifications

The box itself can sample at up to 500 kHz at 16 bit resolution. This is quite a remarkable feat, and one that should ensure very high quality recordings. The electret microphone, while arguably not as sensitive at higher frequencies as the capacitance microphone of the D1000x, is certainly very good and also much more robust and resistant to humidity. Recordings using the same microphone in the D500x show that it is a very capable performer indeed. The box also appears to have a built in anti-aliasing filter set at 190 kHz meaning that all bats with the exception of a few tropical species, can be recorded.

Software

The bundled software allows you to record and view files and is compatible with Windows Vista, 7 and 8, both 32 and 64 bit versions. I have installed it on a range of machines and had a few minor issues that were quickly resolved.
There are separate installation files for Windows Vista and 7 and for Windows 8, so you need to select the correct ones. The problems I encountered were that either installation failed or on starting the software I received an error message. This turned out to be having outdated .NET frameworks and an older Visual Studio C++ re-distributable. These are components of the Windows operating system, so if you computer is up to date, you should be ok, otherwise you may need to install them from the Microsoft website. As the software is 32 bit, if you are using a 64 bit machine (most Windows 8 machines are) you need to make sure you have the 32 bit Visual Studio C++ redistributable installed as well as the 64 bit version.
 
A very important thing to note is that you should install the software BEFORE plugging the M500 into a USB port, otherwise the device drivers may not install properly.
 
The M500 will also be supported in the new version of Batsound due out later this year.
 
If all has gone well, you should now be running BatMicRecorder and should be looking at something similar to that below.


The very minimal look is both for the limited screen space on small tablets and also to reduce the load on the computer's cpu due to the vast amount of data about to be streamed through it.
 
The fun begins when you click the 'Start Sampling' button, and get the following...


 The software - BatMicRecorder

The software has really been designed for automatic logging. This puzzled me at first as I was expecting a big button on the microphone marked 'go' so it took some time to get used to the fact that you need to set up the software to record automatically. There are a lot of functions to customise how the software works, and it does take some time to find your way around the various options, so I will only deal with the major features here. It's also important to point out that while the software allows you to see what you are recording, it doesn't allow any analysis after capture. For that you'll need Batsound or some other package. Fortunately as the files are standard .wav files and are time and date stamped in the file name, this can be anything you are used to, though some freeware packages might not like the high sampling rate. Batscan, while reporting the correct sample rate, doesn't seem to want to display the frequency correctly. One work-around is to open the files in Audacity (freeware) and either view them there or convert the sample rate down to 50 kHz using the 'Set Rate' command which changes the sampling rate in the file header and then view the files as 10x time expansion ones.

Capturing the signal

Firstly, and most importantly, you have two modes to capture the signal. These are 'Automatic' and 'Circular'. By default, the recorder starts in Automatic mode. Note that there is a rather confusing tick box also labelled 'Auto' this does not switch the recorder to automatic mode, rather it enables the 'Auto arm' function that allows the recorder to automatically reset itself so that after capturing one sequence it then waits for the next trigger to capture the next sequence. Without this check box enabled, the recorder will record one sequence and then stop and you have to manually push the 'record' button to start it again.


For the automatic record mode, you can select how long to record for in steps of 0.3, 0.5, 1, 3, 5, 10, 20 and 30 seconds, 1 minute or manual. In manual mode, it carries on recording until you press 'abort'. You can also set a pre-trigger length of 0 seconds (off), 0.1, 0.3, 0.5, 0.7 or 1 second. The pre-trigger allows the software to go back through the recording to before the trigger point. You total recoding time them becomes Recording length + pre-trigger.
 
The circular mode is essentially a manual record mode where all the data is pre-trigger. You can select from a record length of 0.3, 0.5, 1, 3 and 5 seconds. On pressing 'record' the device continually acquires data into a circular memory buffer. If you selected a record length of 10 seconds, then once the buffer is filled up after ten seconds, the data acquired from seconds 10-11 overwrites the data acquired from seconds 0-1 and so on. Once you see or hear and bat and press the 'stop' button, all the data acquired before that point (10 seconds worth) is saved to file. Any trigger settings you have input have no effect in this mode as you control the recording manually and should be greyed out.

Trigger settings

 
How you set the trigger is very important to ensure that you don't miss bats but also don't acquire too much non-bat noise (such as the ever-rustling menace of the 'transect trousers'.). You have two options here, either 'Level' or 'Frequency'. Level is the simplest, in that you adjust the slider between 0% and 100% of the amplitude of the signal. If you have the live oscillogram enabled (Go to Show>Oscillogram) AND the check box marked 'Show' is clicked then you can see white lines that show the trigger level. If the signal goes above or below these lines then the system will trigger. There is a risk that other non-bat noise might trigger the system unless you have the trigger set very high.
 
A more sophisticated method is to use a frequency trigger. Enabling this allows you to adjust two frequency sliders which will define the bandwidth you are interested in. At its simplest you might select 20 kHz in one and 250 kHz in the second, which will look at anything ultrasonic and ignore anything in the normal sonic range. A more sophisticated way might be if you are interested in pipistrelles, set on to 40 kHz and the other to 60 kHz, or even more specific, lesser horseshoes, set one to 105 kHz and the other to 120 kHz. You then set the slider for the intensity (dB) that the signal has to reach before triggering the system. The lower the value, the more sensitive it is. Note that if you set a very low value the system may trigger itself from its own internal electronic noise and continually record.
 
The final setting in the trigger section.is the 'Single' check box. This means that once a signal exceeds the trigger level, the sonogram view and the oscillogram view are frozen so that you can see the signal in more detail. If you have the 'Auto' option enabled, then once a signal triggers the device it is shown for a few seconds before the system arms itself waiting for the next trigger.
 

The settings option


This confused me a little at first as you get a series of options for controlling the horizontal axis time scale which is simple enough, but also a series of settings for recorder settings, such as oscillogram, spectrogram, grid and audio. What these do is to turn off those displays/audio while the recording is taking place. This can stop breaks in the recording due to the pc not being able to keep up with the rate at which data is being acquired. You can check this by looking at the throughput written at the bottom of the window 9see bottom of image below. This shows the acquisition rate currently being used. It's important to check this during a few test recordings of about 10 seconds or more. If it drops below 500,000 (goes red) there is a risk that some data may not be recorded. The occasional drop into red is not an issue as there is a data buffer for the data so it may be able to catch up later on. If it stays below red, disable the spectrogram view from the setings>recorder settings menu to free up cpu resources.
 

Display options

 
The set of options at the bottom allow you to configure how the software looks. You have a range of options for controlling the spectrogram colours, threshold, FFT size and spectrogram and oscillogram scaling. Just play with them until you get the view you like, they don't affect the recordings at all. If you can't see them, go to the 'Show' menu and click on the 'Advanced' box. The show menu also lets you display various parts of the display, useful for saving space on small screens or cpu resources.

Audio

The enable audio check box allows you to listen to the signals as they are being acquired. It uses a process of under-sampling which is to sample the audio at a lower rate than that needed to preserve the signal. in effect you are aliasing the signal to make it lower in frequency. The output sounds a little like a frequency divided output. The slider controls the volume. It's useful for listening for bats - turning your M500 and laptop into a kind of frequency-division detector, but it's best to listen through headphones or you may find that the audio output from your laptop gets re-recorded by the M500 and then output again and re-recorded creating both horrible recordings and nasty feedback. The audio option also uses up cpu resources, so if you have a lower-specified machine I would suggest turning it off if the system struggles.
 

Uses

This is the tricky part, what do you use it for? It's a lovely thing, but what would you use it for in the field? Every consultant has their favourite way of working, some like to take out the best equipment going, others like to go minimalist. Personally I like a detector that has a 'go' button so that I can just watch bats and not equipment. For that reason I actually prefer a D240x with a recorder, small, not too many settings and good quality recordings. I probably wouldn't take a laptop/tablet in the field as I like to watch bats and not screens, but I can see that as an automatic recorder, you could set the trigger settings, set up the laptop/tablet to stay on when you closed the lid, put it in a rucksack and set off on your transect. Essentially you get the quality of a D500x at a fraction of the cost assuming you already have a laptop. Ditto for remote logging if you can leave the laptop in a safe place, such as in lofts or barn. It would however be perfect for education use to both see and hear echolocation calls as they happen.
 

Glitches

Like most new products, especially software, there are bound to be a few issues. The most troubling was the installation of the C++ redistributable packages. Once this was sorted out, everything else went fine. Occasionally menu items don't work properly, or can't be selected, but this has always been solved by closing down the program and restarting. One issue I have had a few times is that if you leave the M500 attached, close the software and restart, an error is reported. Simply close the software, unplug the M500, plug it back in and restart the software. I'm sure software updates will gradually sort these minor problems out.
 

Examples

A few examples of some bats to show you the screen outputs. I haven't particularly optimised the views in terms of spectrogram levels or time axes, but it gives you an idea of different species.
 

Pipistrelle


Daubenton's


 Greater Horseshoe


 Noctule


Verdict

This is really an amazing piece of kit, which for the price is even more amazing. You do have to ask yourself what you would use it for. This approach of screens in the field may not work for some and it's worth having a good long think about how you would use it.  The quality of recordings is second to none save perhaps those from a D1000x at ten times the price. The size, sensitivity, versatility and quality make it very attractive for the price, though you will need a laptop or a tablet and some form of analysis software as well. Essentially it turns your laptop into a real-time bat analyser and data-logger, so perhaps the limitation is me for not being inventive enough to think of new ways of using it.