How to make a bat lure.
Acoustic lures are now sometimes being used for bat surveys
whereby ultrasound is used to attract bats to mist nets or harp traps. This can
be especially valuable in dense woodland which is difficult to survey, and
where bats may be feeding high up in the canopy. The addition of acoustic lures
to Natural England Class 19 and 20 licenses also means that more consultants
are now able to use this technique.
The broadcast of ultrasound has always been problematic
however. Most commercial loudspeakers only work up to the low 20 kHz range, and
even then are relatively low-powered. The excellent Ultrasound Advice S55
loudspeaker and amplifier is no longer available which used to be the only
commercially available speaker to be able to output at sufficiently high levels
over the full ultrasound range used by bats.
There are now a number of commercially available acoustic
lure systems, but here I will show how it is possible to make an acoustic lure
for bats and generate the sound files necessary based on separate components
which are currently available.
The two major limitations are the loudspeaker, and the
signal generator.
The speaker
The Pettersson L400 ultrasound loudspeaker is a specialised
tweeter housed within a rugged aluminium box and powered by either eight AA
batteries or a 12-28 Volt external supply. It can handle a frequency range of
between 10-110 kHz at up to 100 dB SPL at 1 m. It has a built-in volume control
knob and a female phono connection to accept input signals. It’s available from
NHBS at £1400 or direct from Pettersson.
There is also a standard camera tripod mounting bush on one
side allowing it to be mounted on a tripod. The frequency response (below)
shows it more than capable of outputting signals over the range used for
acoustic lures.
The extended frequency response should also allow realistic
reproduction of bat echolocation calls, but this would require very high
sampling sound cards (which are only now becoming available) or digital to
analogue output cards running via data acquisition software such as Labview.
There are now some sound cards that operate at 192 kHz which could potentially
allow playback of frequencies up to 85 kHz.
The broadcast system
This used to be a severe limitation in the broadcast of
ultrasound signals in that you need a sampling rate at least twice that of the
highest frequency signal you want to output. The typical industry standard
maximum sampling rate was 44.1 kHz, meaning that you could only output signals
up to 22 kHz. This would actually work fine for social calls of pipistrelles,
but is a bit of a limitation for anything else. However, improvements in
technology and demands from consumers for better quality audio has meant that
higher sampling rates are now available in small affordable devices, and the
new maximum sampling rate often quoted is 96 kHz. This means that it should be
possible to output signals at up to 48 kHz, good enough for low frequency bats.
The broadcast of full bat echolocation calls is still very specialist and
usually requires complex (and expensive) data acquisition cards. However, 48
kHz is more than good enough for an acoustic lure.

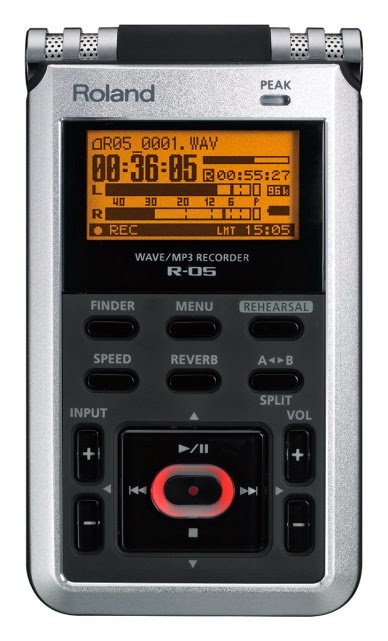
One such device is the Roland R-05 recorder (sometimes
marketed under the Edirol brand – Edirol being just a brand used by Roland).
While this device can sample at up to 96 kHz, so theoretically output up to 48
kHz, the specification shows it limited to 40 kHz, probably due to
anti-aliasing filters somewhere along the line. The Zoom devices such as the
Zoom H1, H2 and H4 also appear to have 96 kHz sampling rates, so should also be
suitable, though I haven’t been able to find any specifications on the actual available
bandwidth. If you don’t have one of these devices, you could also use the
speaker (line) output from a laptop if it supports the higher sampling rates.
Connecting the two
All you will need to do now is to connect the recorder to
the speaker, and for this you will need a 3.5mm stereo jack to phono lead. The
jack goes into the recorder, and one of the phono leads attaches to the
speaker. For the recorder, it is important to put the lead into the Line-out
socket, not the headphones socket. If you recorder does not have a line-out
socket, the headphone socket may be configurable as a line-out socket through
the device’s menu or by a switch. Have a look at the manual.
As your recorder is a stereo device, it can create two
separate tracks for each file, a left and a right. If you create the file on
one channel (see below) then you will need to connect the right end of the lead
to the phono socket on the loudspeaker. The easy way to remember this is that Red is Right. So if you create your file with the lure sound on the right
channel, connect the red lead, if it’s on the left channel, connect the white
lead. If it’s on both channels it doesn’t make any difference which lead you
use. It’s also possible to create a mono file that doesn’t have two separate
channels, so again, connect either lead. I don’t suggest you do this as some modern
digital devices have trouble with mono files and don’t know what to do with
them. It’s safer to create a stereo file as you know it will work.
Now that you have the hardware set up, all you need to do
now is to create the lure sound files.
Creating the lure files
One of the easiest and most versatile pieces of software to
generate lure files is Adobe Audition, however, this is a costly piece of
software (about £250), so I’ll show how to do it in Audacity, an excellent
freeware program available for Windows, Linux and Macs from:
So download and install Audacity, which is quite a small
program so installs very quickly.
You should now be looking at something like that below:
The first thing we need to do is to change the project
settings to reflect both the correct data type and the correct sampling rate.
Go to Edit>Preferences
then select ‘Quality’ and change the
settings for the Default Sample rate to 96000 Hz and the Default Sample Format
to 16-bit.
The Roland recorder, and many others, are capable of
recording and outputting files at 24 bit. However, for our purposes, this just
means that the files are bigger and there is a greater risk of them not
outputting correctly, so it’s safer to stick to 16 bit.
Then click ‘OK’.
You should now see that the project rate in the bottom left
hand corner of the screen says 96000 Hz.
Now we’re ready to generate out lure files.
There is a great deal of debate about what acoustic lure
files work best, and it’s still a matter of trial and error, so we’ll create
one that has the elements of those which are suggested to work well. Once we can create
one, then we can tweak all the components as much as we like.
First, create a new blank track.
Go to Tracks>Add
New>Stereo Track
This should create a new blank audio track that we can put
out generated signals into. By default, what we generate in one track should
also happen in the other track too.
So now we’re looking at two tracks, click the mouse into one
of the tracks at the far left hand side.
Then go to Generate>Chirp
and in the box that appears, select the waveform as Sine, the start frequency
as 35000, the end frequency as 25000, the start amplitude as 0, the end
amplitude as 1, the interpolation as logarithmic and the Duration as 00.025
seconds, as shown below.
Then click OK
This will generate a tone that will start quiet at 35 kHz,
then sweep down logarithmically to reach maximum intensity at 25 kHz 25 ms
later. This is the first half of our tone. We now need to make it sweep back up
again.
This time, select the right most side of the signal you have
just generated, but now go to Generate>Chirp,
but do the opposite, start at 25000 and intensity 1, and end at 35000 intensity
0, with the duration still set to 0.025 seconds.
If you now go to View>Fit
In Window, you should see the signal looking something like this:
So now we have a signal that starts at 35 kHz, sweeps down
to 25 kHz, then back up to 35 kHz in 50 ms.
The sonogram, (in Batsound) looks like this:
Notice that there is a little frequency ‘blip’ at the bottom of the sweep, this is
caused by the joining of the two signals that are not quite in phase. This is a
little messy, which is why it’s easier to generate these files in Adobe
Audition where we can generate these frequency modulations more easily, but we
can live with this.
Now we have one sweep cycle, we can just copy and paste the
generated file as often as we like to build up a sequence.
Click the mouse onto the left hand of the waveform and
either drag it to the right hand side, or click over the left hand side of the
waveform and hold down the Shift key and use the right hand arrow button to
select the whole waveform. This is better as the selection stops when you reach
the right hand side.
The select Edit>Copy
and click or use the cursor keys to select the right hand end of the waveform
and lick Edit>Paste or use
Control+V and you’ve added a copy of the waveform, so now you have two up and
down cycles. If you can’t see it all, go to View>Fit In Window.
Now go to the end of the next waveform and press Control+V
again, and you get another one, go to the end of that one and press Control+V
and so on. I’d suggest perhaps ten cycles, so the total lasts now 500 ms. In
Batsound it now looks like this.
Now we could leave it at that, and it will work, but it’s
nice to have a bit of a lead in and lead out time, so we’ll put some silences
at the beginning and end, I suggest 500
ms will do.
Select the very start of your sequence, and then go to Generate>Silence. In the box put in
00.500s
Click OK, then go to View>Fit
in Window.
Do the same at the end of the track to add a 500 ms silence
at the end.
And that’s it!
The final file looks like this:
You can now save your file as a .wav file onto the memory
card of your recorder go to File>Export and choose WAV file format, paying attention
to any specific file format rules that might apply to your recorder. The Roland
R-05 should be able to play files with any name.
After exporting your .wav file, you can save your project
file, it is saved as an .aup file which audacity can then edit again.
If you have a repeat play function on your recorder, then
simply play the file but set it to repeat over and over. If you don’t have a
repeat play option, then simply copy and then paste the whole of your sequence at
the end of the preceding part to double it up, and then copy and paste again to
double that up and so on until you have a sequence the length you need.
Once you have mastered the general principles you can create
files of almost any structure by combining sweeps, tones, silences, noise and
so on.
If you want to make more complex amplitude modulations (i.e.
change the loudness up and down), then a good way is to use the Envelope Tool, which allows you to
select different parts of the waveform and then drag their amplitude up and
down as shown below.
Audacity is a very sophisticated program, and there are
better ways of achieving the same end but this requires the use of scripting to
combine two or more waveforms to achieve both the frequency modulation and the
amplitude modulation.
If the clicks bother you at the bottom of the waveforms then
you can use Audacity to high pass the signal above 20 kHz (go to Effect>High Pass Filter then set the
slider to 20000 Hz). It may be that the
bats like the clicks. The signals that they seem attracted to bear no relation
to their normal social calls, perhaps they’re just very inquisitive animals?
Using real social calls
One final note is that if you have recordings of real social
calls, you might want to use those instead. However, you will need to convert
the sample rate to that of the output device. In principle, this is can be
easily done in Audacity, but there are a number of issues to consider.
If you have files
from a D500x, D1000x or other device that streams the sound files to a memory
card, then the file header has the real sample rate embedded within it, such as
500 kHz. In this case if you simply open the file and go to the Tracks>Resample option and type in
the new sample rate, Audacity will resample the track down to the new sample
rate which should match that of the recorder i.e. 96 kHz to maintain both the
duration and the frequencies of the original signal. However, you are in effect
aliasing the signal by resampling at too low a sample rate to preserve all the
information. This means that parts of the signal higher than 48 kHz will be
aliased which may create some unwanted lower frequency elements. Anything below
48 kHz should remain unaffected. It does seem though that Audacity will automatically low-pass the signal before resampling, meaning that aliasing should not be a problem, though obviously anything above 40 kHz will be lost.
The situation is a little more complicated for time-expanded
signals which have been recorded on an external recorder. Say a 2 second
sequence has been recorded and output as 10x time expansion so that it lasts 20
seconds and recorded onto an external device at a sampling rate of 44.1 kHz. If
we resampled this signal up to 96 kHz, we would still have a 20 second long
track where all the frequencies were 10x lower than we needed, we would just
have a signal with a higher sampling rate.
First we need to change the sample rate in the file header
to make the sequence 2 seconds long again, and so with the drop down box from
the ‘Audio Track’ option to the
right of the track, select ‘Set Rate’
and choose a sample rate 10x that of the original file – if it was 44.1 kHz,
select ‘Other’ and type in 441,000 Hz (note that Audacity works in Hz
rather than kHz so always multiply any kHz frequencies by 1,000).
Now we have a file of the right length (2 seconds) and with
the right frequencies, we have to choose the Tracks>Resample option and set it to 96 kHz, to allow out
recorder to play it.
It should be pointed out that resampling can sometimes introduce some nasty artefacts into recordings, so always look (and listen) to the recordings afterwards to make sure they are faithful to the original.
I should add of course that ultrasound is very directional, and will be beamed quite tightly from the loudspeaker, higher frequencies being more directional. So a low frequency (15-20 kHz) signal will be broadcast quite widely, while a 40 kHz signal will be pretty directional. The Sussex Autobat has the famous 'twiddler' that broadcasts that signal around (and also adds some amplitude and frequency modulations that appear to make the signal more attractive), so using the L400 it would be best to change the direction of broadcast frequently during a session.


